Setup Ente Photos app
Ente Photos app is a fully open source, end-to-end encrypted platform to store your photos(an open source alternative to Apple and Google Photos).Ente photos can be also used to Self-host and integrate with any S3 compatible storage platform like Ceph RGW.
Huge shout-out to the Ente team for their awesomeness!
We are using Ente Photos app to store our photos integrating with the Ceph Cluster that we have built.
Okay, now here are some bare minimum basics of Ente architecture to get started.
There are three major Components in Ente platform:
- Ente desktop and mobile app --> This is the user interface
- Ente Musuem server with Postgress --> Stateless API server which manages the access of data
- Ceph RGW external --> This is where the actual data is stored in S3 buckets
For the uploads to work, all three of them need to be able to reach each other. This is because the client uploads directly to the object storage. The interaction goes something like this:
- Client wants to upload, it asks museum where it should upload to.
- Museum creates pre-signed URLs for the S3 bucket that was configured.
- Client directly uploads to the S3 buckets using these URLs.
Read more about Museum and Ente architecture here
Ente desktop app and mobile app
- You can download and install the desktop app from their official website.
- To use it in your mobile phone, you can install the android app from playstore
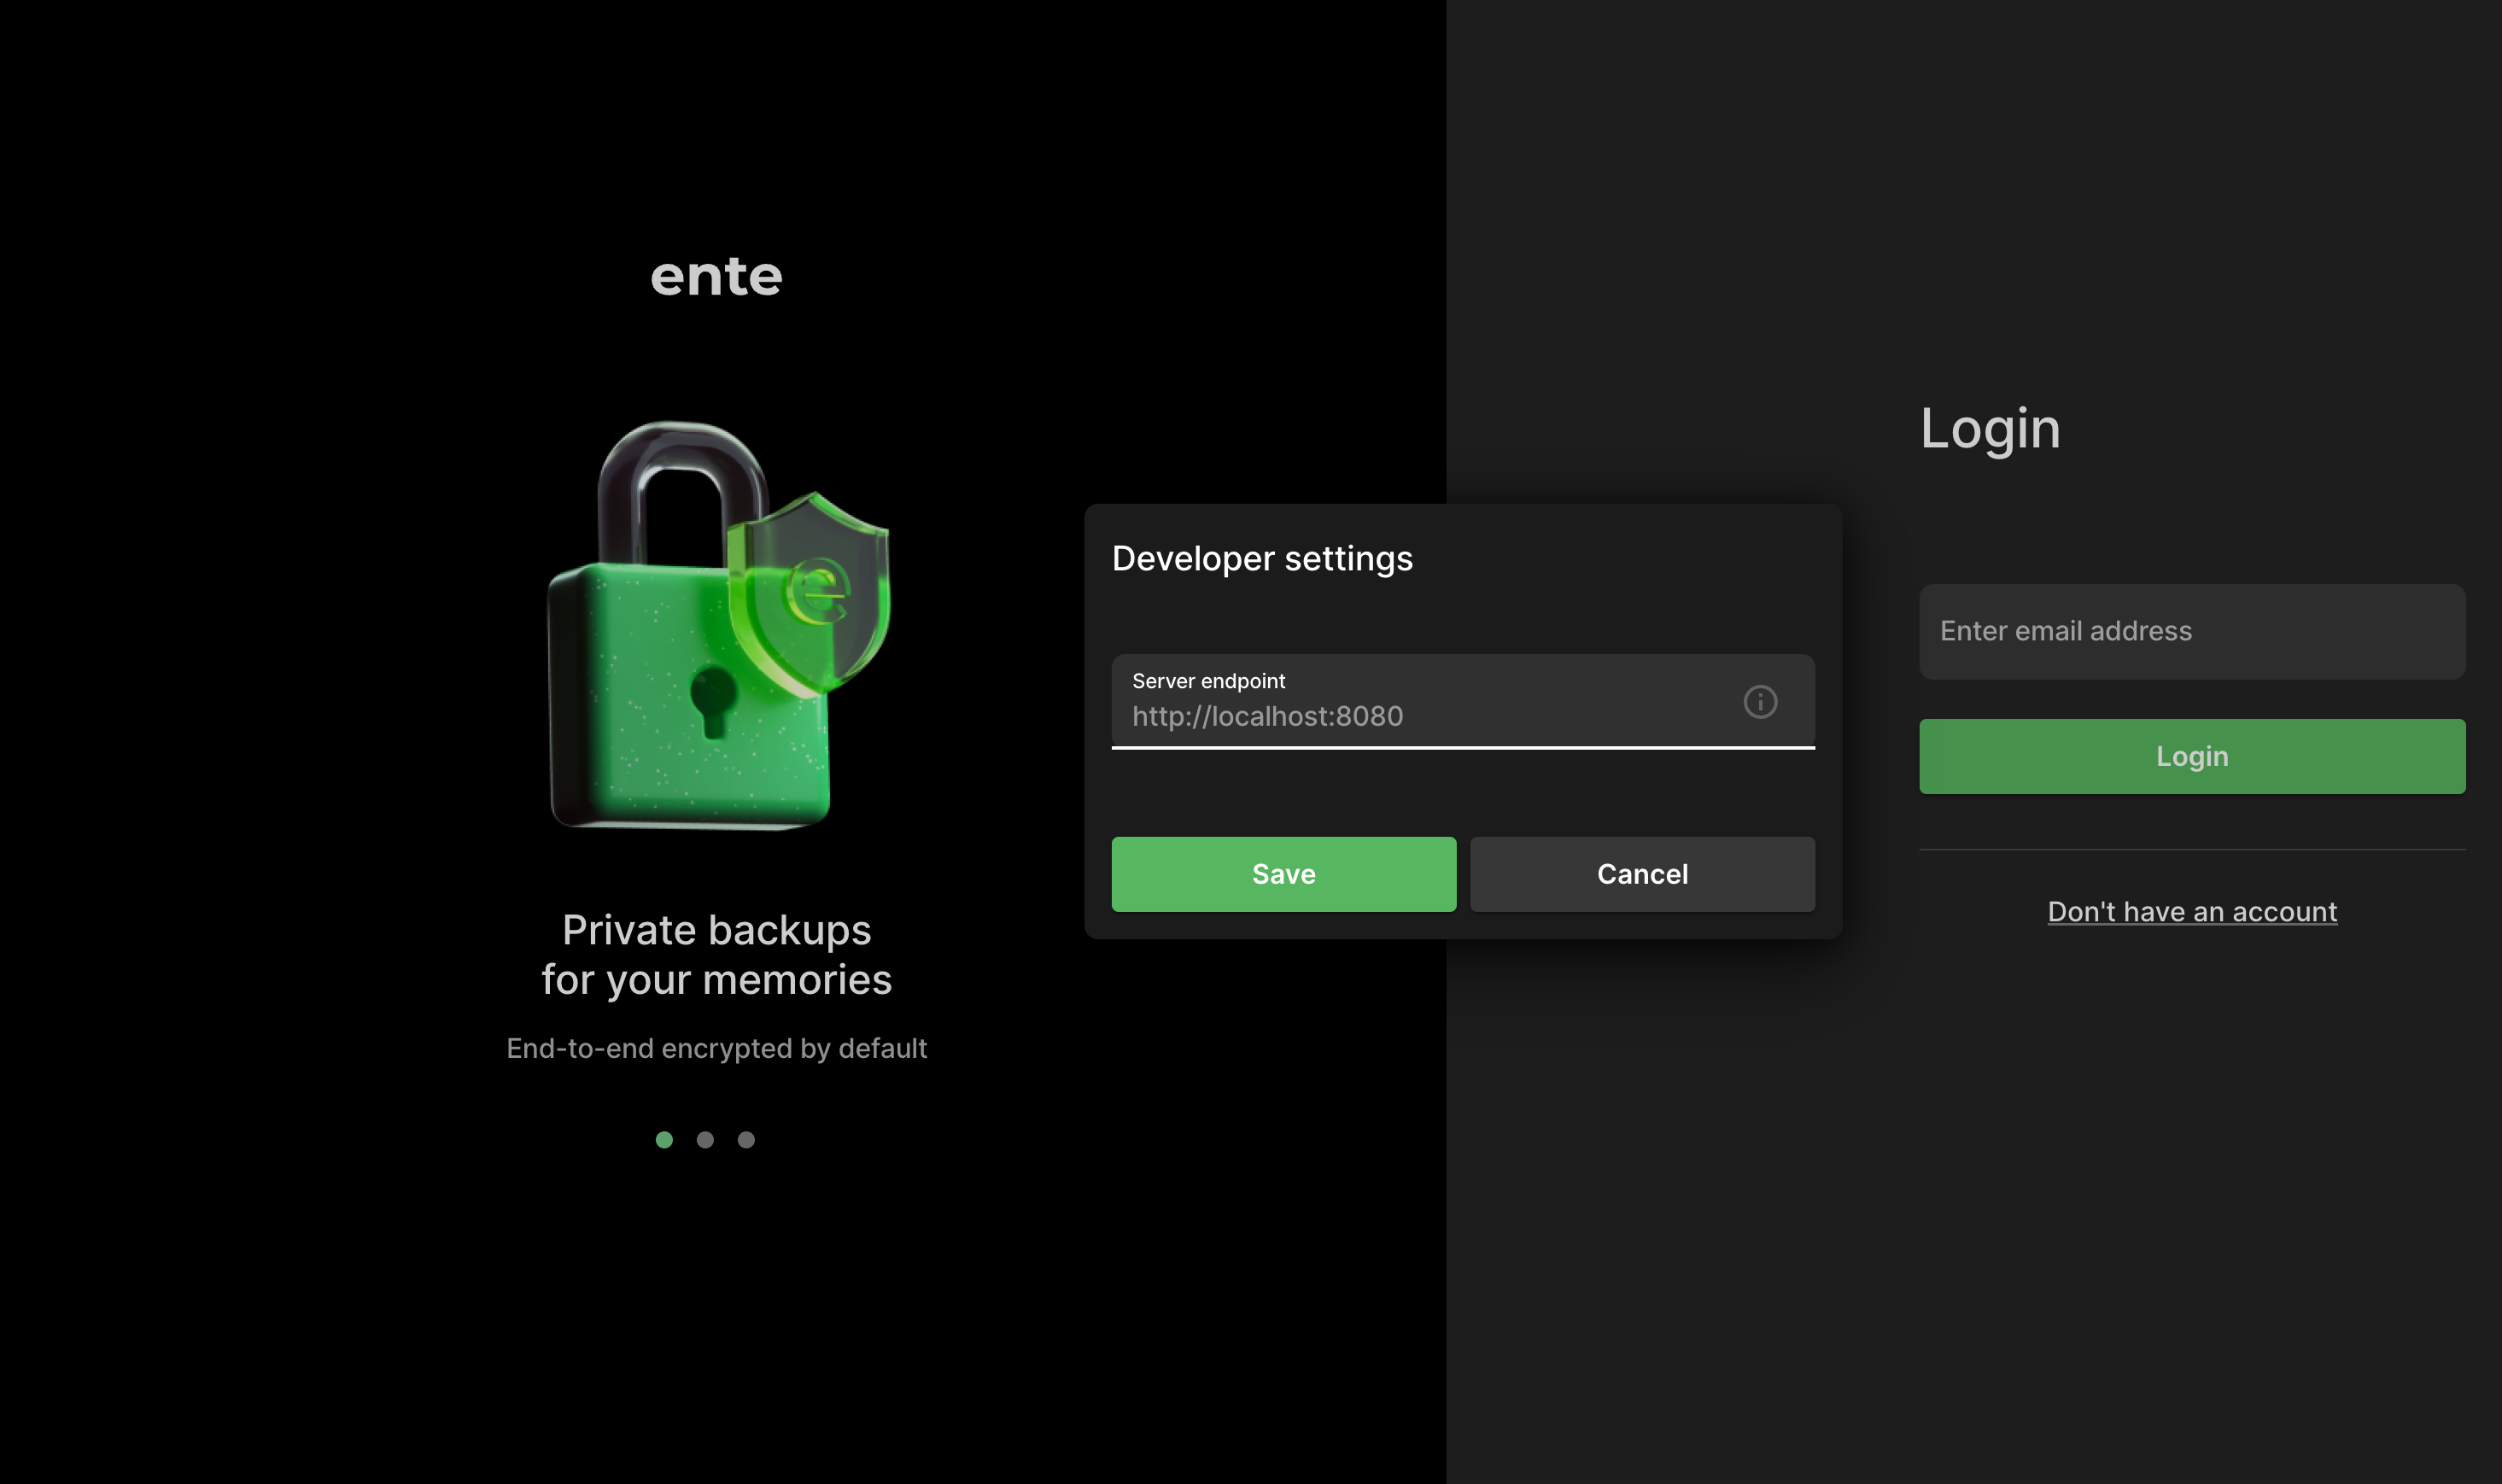
By default if you login, the app will connect to Ente's production server endpoint which is not what we want. For self-hosting, we need to provide our local endpoint. Now here is the trick; tap 7 times on the onboarding screen and to bring up developer settings page where you can configure the endpoint the app should be connecting to.
Deploying Ente Musuem server with Postgress
There are couple of different ways to install Ente server as documented here. We are using published Docker image method.
Steps:
-
In one of the Raspberry Pi machine create a directory where you'll run Ente
# mkdir ente && cd ente -
Copy the starter compose.yaml and its support files from the repository onto your directory. You can do it by hand, or use (e.g.) curl
> compose.yaml
# curl -LO https://raw.githubusercontent.com/karunjosy/CephBox/refs/heads/main/ente_with_ceph/compose.yaml

# mkdir -p scripts/compose
# cd scripts/compose

> scripts/compose/credentials.yaml
# curl -LO https://raw.githubusercontent.com/karunjosy/CephBox/refs/heads/main/ente_with_ceph/credentials.yaml

# cd ../..NoteThe above files are customized to get Musuem server running with Ceph as backend. Read more about these services here
-
Here is a sample for compose.yaml
services:
  museum:
    image: ghcr.io/ente-io/server
    ports:
      - 8080:8080 # API
      - 2112:2112 # Prometheus metrics
    depends_on:
      postgres:
        condition: service_healthy
    environment:
      # Pass-in the config to connect to the DB and MinIO
      ENTE_CREDENTIALS_FILE: /credentials.yaml
    volumes:
      - custom-logs:/var/logs
      - ./museum.yaml:/museum.yaml:ro
      - ./scripts/compose/credentials.yaml:/credentials.yaml:ro
      - ./data:/data:ro
    networks:
      - internal

  postgres:
    image: postgres:15
    ports:
      - 5432:5432
    environment:
      POSTGRES_USER: pguser
      POSTGRES_PASSWORD: pgpass
      POSTGRES_DB: ente_db
    # Wait for postgres to be accept connections before starting museum.
    healthcheck:
      test:
        [
          "CMD",
          "pg_isready",
          "-q",
          "-d",
          "ente_db",
          "-U",
          "pguser"
        ]
      start_period: 40s
      start_interval: 1s
    volumes:
      - postgres-data:/var/lib/postgresql/data
    networks:
      - internal
volumes:
  custom-logs:
  postgres-data:


networks:
internal: -
scripts/compose/credentials.yaml sample:
db:
    host: postgres
    port: 5432
    name: ente_db
    user: pguser
    password: pgpass

s3:
    are_local_buckets: true
    b2-eu-cen:
        key: <access_key>
        secret: <secret_key>
        endpoint: 10.x.x.x:80
        region: eu-central-2
            bucket: test
-
-
Edit the credentials.yaml to add the ceph RGW endpoint and bucket details. You may also edit the postgres password.
-
Install docker and docker-compose if not present
- docker-compose :
# apt install docker.io -y;
curl -L "https://github.com/docker/compose/releases/latest/download/docker-compose-$(uname -s)-$(uname -m)" -o /usr/local/bin/docker-compose; chmod +x /usr/local/bin/docker-compose

#docker-compose --version
Docker Compose version v2.29.7- docker engine install
# apt install ca-certificates curl gnupg;
install -m 0755 -d /etc/apt/keyrings;
curl -fsSL https://download.docker.com/linux/debian/gpg | sudo gpg --dearmor -o /etc/apt/keyrings/docker.gpg;
 sudo chmod a+r /etc/apt/keyrings/docker.gpg;
echo "deb [arch=$(dpkg --print-architecture) signed-by=/etc/apt/keyrings/docker.gpg] https://download.docker.com/linux/debian $(lsb_release -cs) stable" | sudo tee /etc/apt/sources.list.d/docker.list > /dev/null;
apt update;
apt install docker-ce docker-ce-cli containerd.io docker-buildx-plugin docker-compose-plugin;
docker version

Version: 27.3.1 -
Create RGW user and bucket. You may refer the steps here
-
Set CORS for the bucket created
-
Create cors.xml file
<CORSConfiguration>
    <CORSRule>
        <AllowedOrigin>*</AllowedOrigin>
        <AllowedMethod>GET</AllowedMethod>
        <AllowedMethod>HEAD</AllowedMethod>
        <AllowedMethod>POST</AllowedMethod>
        <AllowedMethod>PUT</AllowedMethod>
        <AllowedMethod>DELETE</AllowedMethod>
        <AllowedHeader>*</AllowedHeader>
        <ExposeHeader>Etag</ExposeHeader>
        <MaxAgeSeconds>3000</MaxAgeSeconds>
    </CORSRule>
</CORSConfiguration> -
apply it to the bucket using s3cmd
s3cmd setcors cors.xml s3://test
Note : To install s3cmd client refer here
-
-
compose.yaml starts museum and postgress containers by pulling container images. From the ente directory run
docker-compose upor if you want to run the process in background
nohup docker-compose up & -
Open the mobile or desktop app and tap 7 times and enter the endpoint
https://<IP>:8080 -
Create an account and upload your first photo!
NoteYou will get the OTP send to the email ID from the museum container log. To create and manage accounts, refer here
Additional settings for better user experience
If you have reached here, it means you will have a working setup to test around. But if you are planning to use it for real, we need to do some additional settings, mainly
Modify encryption keys from the default random provided
To make it easy to get started, some randomly generated values are provided in the default configuration. But if you're really going to be using museum, please generate new keys. You can use go run tools/gen-random-keys/main.go for that. Refer here for more details
Add this to scripts/compose/credentials.yaml file
key:
    encryption:
    hash:

jwt:
    secret:
Hard-coded OTP
You can hard-code the OTP that gets sent to the first user account so that you don't require to review the logs to get them. Add this to scripts/compose/credentials.yaml file
internal:
    silent: false
    health-check-url:
    hardcoded-ott:
        emails:
            - "example@example.org,123456"
    #     # When running in a local environment, hardcode the verification code to
    #     # 123456 for email addresses ending with @example.org
        local-domain-suffix: "@example.org"
        local-domain-value: 123456
    # List of user IDs that can use the admin API endpoints.
    # If this is not set, as a fallback, the first user is considered an admin.
    admins: []
Increase storage space for the users
By default, users will have only the 5GB quota assoicated with the free plan. In self-hosting environment such as ours, we can custom set the quota for the users.
This procedure is bit an overhead as of now, but we would need to do this procedure only a couple of times or maybe just once.
There are binaries available to install and run it from your local desktop/laptop or you can do this procedure in the same raspberry host.
First, we have to configure ente-cli administration tool
-
Build docker image from Github source
# mkdir ente-cli && cd ente-cli
# git clone https://github.com/ente-io/ente

> Goto cli folder
>  # cd cli
>  Modify the docker-compose.yml and add volume. cli-data volume is mandatory, you can add more volumes for your export directory.

# docker-compose up -d --build -
We need to get CLI to connect to the custom museum server. Define a config.yaml and put it either in the same directory as CLI or inside the container
docker exec -it cli-ente-cli-1 /bin/sh

vi config.yaml
  endpoint:
api: "http://<IP>:8080" -
Add the existing user as an admin account.
# ./ente-cli account add
Enter app type (default: photos):
Use default app type: photos
Enter export directory: data
Enter email address: example@example.org
Enter password:
Please wait authenticating...
Account added successfully -
Get the ID of the user
# ./ente-cli account list
Configured accounts: 1
====================================
Email:     example@example.org
ID:        1580559962386438
App:       photos
ExportDir: data
==================================== -
Add the ID to scripts/compose/credentials.yaml file we used to compose the museum server
internal:
    silent: false
    health-check-url:
    hardcoded-ott:
        emails:
            - "example@example.org,123456"
    #     # When running in a local environment, hardcode the verification code to
    #     # 123456 for email addresses ending with @example.org
        local-domain-suffix: "@example.org"
        local-domain-value: 123456
    # List of user IDs that can use the admin API endpoints.
    # If this is not set, as a fallback, the first user is considered an admin.
    admins:
- 1580559962386438 -
Restart the museum container or redo docker-compose
-
Increase the Quota for the user from ente-cli container
# ./ente-cli admin update-subscription -a example@example.org -u example@example.org --no-limit False

  Enter a storage size (e.g.'5MB', '10GB', '2Tb'): : 100GB
  Enter sub expiry date in YYYY-MM-DD format  (e.g.'2040-12-31'): 2040-12-31
  Updating storage for user example@example.org to 100.0 GB (old 5.0 GB) with new expirty 2040-12-31 (old 2124-11-15)
  Are you sure you want to update the storage ('y' or 'n')?: y
  Successfully updated storage and expiry date for user